
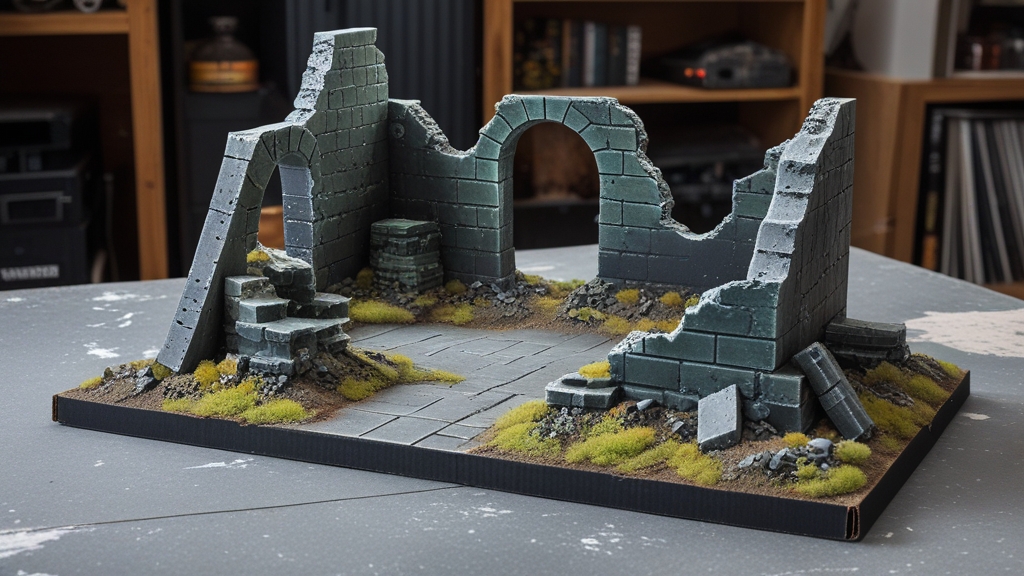
You can build great Warhammer terrain from household materials for almost nothing. Cardboard, foam board, hot glue, and texture paint are all you need to create convincing ruins, hills, and buildings that look fantastic on the tabletop. A full table’s worth of DIY terrain can be built for under £20, compared to £200-400 for equivalent Games Workshop terrain kits. The results are often more characterful and unique than mass-produced plastic terrain, and the building process is a deeply satisfying hobby in its own right.
Terrain transforms a flat gaming mat from a featureless expanse into an immersive battlefield. It’s also mechanically essential — Warhammer 40k and Age of Sigmar are balanced around terrain providing cover, blocking line of sight, and creating tactical decisions about movement and positioning. Playing without adequate terrain produces unbalanced games where shooting armies dominate. This guide covers everything from basic materials to complete terrain-building tutorials that anyone can follow.
What Materials Do You Need for DIY Warhammer Terrain?
Essential Materials
Foam board (foamcore): 5mm foam board from craft stores or pound shops is the foundation material for terrain building. It cuts cleanly with a hobby knife, glues easily, and is rigid enough for free-standing structures. A pack of A3 foam board sheets costs £3-5 and provides enough material for several buildings. Dollar Tree and Poundland foam board is popular in the community for its low cost, though quality varies.
Cardboard: Free from any household delivery box, cereal box, or packaging. Corrugated cardboard (from delivery boxes) works for larger structures, while thin card (cereal boxes, food packaging) is better for detail work like tiles, brickwork, and surface cladding. Start saving cardboard now — you’ll use more than you expect.
Hot glue gun: The terrain builder’s best friend. Hot glue bonds foam board, cardboard, plastic, and most other terrain materials within seconds. A basic hot glue gun costs £5-8 and a pack of glue sticks costs £2-3. Superglue and PVA also work but are slower or weaker for large structural bonds.
PVA glue (white glue): Essential for applying texture and sealing surfaces. Mixed with water, PVA creates a sealant that hardens foam board against damage, bonds sand and grit for texture, and provides a good surface for priming. A large bottle of PVA costs £2-3 from any craft or hardware store.
Sand and small gravel: For basing terrain and adding ground texture. Coarse sand from a hardware store (£1-2 for a large bag) or gathered from outdoors provides natural-looking texture when applied over PVA. Model railway suppliers sell graded ballast in various sizes for more precise texturing.
Hobby knife: A retractable craft knife or X-Acto knife for cutting foam board and card. Replace blades frequently — a sharp blade is safer and produces cleaner cuts than a dull one. Always cut on a cutting mat.
Useful Additional Materials
Extruded polystyrene foam (XPS): Available as insulation board from hardware stores. This dense, smooth foam cuts and carves easily, can be sculpted into rocks, cliffs, and organic shapes, and takes paint well. Unlike expanded polystyrene (the white beady stuff), XPS doesn’t crumble into tiny balls and produces clean edges. A 600×1200mm sheet costs £5-10 and provides material for extensive terrain projects.
Texture paint/paste: Citadel texture paints (Astrogranite, Stirland Mud) or generic acrylic texture paste add realistic ground texture to terrain bases. For budget texture, mix PVA glue with sand and a little paint to create your own. Pre-made texture rollers from companies like Green Stuff World create repeatable patterns like brick, cobblestone, or wood planking.
Cocktail sticks and coffee stirrers: Perfect for wooden beams, fence posts, barricades, and scaffolding. Coffee stirrers make excellent planks for wooden platforms, bridges, and barricades. These cost almost nothing and add tremendous character to terrain pieces.
Household junk: Bottle caps become industrial tanks, pen tubes become pipes, plastic packaging becomes sci-fi machinery, medicine cups become reactor cores. Terrain builders develop an eye for everyday objects that could become battlefield elements. Keep a “junk box” of interesting shapes and textures for future projects.
The two things you can’t get out of the recycling bin are a decent glue gun and a stack of 5mm foam board.

Price details
Product prices and availability are accurate as of the date/time indicated and are subject to change. Any price and availability information displayed on Amazon.com at the time of purchase will apply to the purchase of this product.As an Amazon Associate, Warhammer Guild earns from qualifying purchases.
How Do You Build Foam Board Ruins?
Ruined buildings are the most common and most useful terrain type for Warhammer 40k. Here’s a step-by-step tutorial for building a set of ruins from foam board:
Step 1: Cut the Wall Sections
Using a ruler and hobby knife on a cutting mat, cut foam board into wall sections. A typical ruin has 2-3 wall sections at right angles, each approximately 8-12cm tall and 10-15cm wide. Don’t make the walls too regular — real ruins have broken tops and collapsed sections. Cut the tops of walls in irregular, jagged lines to suggest battle damage.
For windows, draw the outline on the foam board and carefully cut out the shape. Gothic arch windows are a Warhammer classic and surprisingly easy to cut — draw a pointed arch shape and cut along the lines. Leave the bottom of the window at least 2-3cm from the ground to represent a wall beneath the window.
Step 2: Assemble the Structure
Hot glue the wall sections together at right angles. An L-shape (two walls) or U-shape (three walls) creates a ruin with interior space that models can occupy. Ensure the walls are vertical and the base is flat so the terrain sits stably on the gaming table.
Add a floor base by cutting a foam board rectangle slightly larger than the wall footprint. Glue the walls to this base. The base provides stability and defines the terrain piece’s footprint for gaming purposes.
Step 3: Add Detail and Texture
This is where foam board ruins go from basic to impressive:
Brickwork: Use a pencil or ball-point pen to score horizontal and vertical lines into the foam board surface, creating a brick pattern. Press firmly enough to leave visible lines but not so hard that you cut through. This simple step immediately makes walls look like masonry rather than flat board.
Battle damage: Use a hobby knife to gouge chunks out of wall edges and corners. Peel away sections of the top paper layer of the foam board to expose the foam underneath — this creates a realistic chipped plaster effect. Use a lighter or heat gun (carefully!) to melt small craters in the foam for bullet holes and impact damage.
Rubble: Scatter small pieces of cut foam board, gravel, and sand around the base of the ruin to represent fallen debris. Glue these down with PVA. Rubble makes ruins look like they were once complete buildings rather than purpose-built wall fragments.
Step 4: Seal and Prime
Brush a coat of PVA glue mixed with water (roughly 50/50) over all foam board surfaces. This seals the foam core, preventing spray paint propellant from dissolving it and providing a better surface for paint adhesion. Let the PVA coat dry completely (2+ hours) before priming.
Prime the entire ruin with grey or black spray primer. Cheap spray paint works fine for terrain — you don’t need hobby-grade primer. Montana Gold, Rustoleum, or any hardware-store spray paint in a neutral colour will work. Apply after the PVA seal coat is fully dry.
Step 5: Paint
Terrain painting is faster and rougher than miniature painting. Heavy drybrushing is the dominant technique:
1. Basecoat the entire ruin in a dark grey or brown (Mechanicus Standard Grey, Dryad Bark, or any equivalent). Apply with a large brush — speed matters more than precision.
2. Heavy drybrush with a lighter grey (Dawnstone, Administratum Grey). This catches all the raised texture — brickwork lines, rough edges, rubble — and creates instant depth.
3. Light drybrush with an even lighter grey or off-white (Longbeard Grey, Pallid Wych Flesh) on the most raised edges and corners.
4. Optional: apply washes of Agrax Earthshade or Nuln Oil into recesses for added depth. For weathering, sponge on patches of dark brown and rust orange for a battle-worn appearance.
How Do You Make Hills and Elevated Terrain?
Hills are the simplest terrain to build and among the most useful for gameplay, providing elevation bonuses and line-of-sight blocking.
XPS Foam Hills
Stack layers of XPS foam insulation board, each slightly smaller than the one below, to create a stepped hill. Round the edges with sandpaper or a surform tool for a natural profile. Coat with PVA, apply sand texture, prime, and paint in earthy tones with grass flock or static grass on top.
For rocky outcrops, break XPS foam by snapping it rather than cutting — the jagged break line looks like natural rock faces. Stack broken pieces at angles and glue together for dramatic cliff features. Paint with grey drybrushing for a convincing rock appearance.
Polystyrene Hills (Budget Option)
Expanded polystyrene (the white packaging foam) can be shaped with a hot wire cutter, serrated knife, or even by snapping and tearing for rough rock textures. It’s often free from packaging waste. The downsides are the mess (polystyrene balls everywhere), the need for a PVA seal coat before painting (spray paint dissolves uncoated polystyrene), and the relatively fragile finished product. For budget terrain that stays on a home table, it works fine.
How Do You Make Scatter Terrain from Junk?
Scatter terrain — small, individual terrain pieces like barricades, crates, barrels, pipes, and debris — fills the gaps between major terrain features and makes battlefields feel lived-in. Much of it can be built from household junk:
Barricades: Glue cocktail sticks or coffee stirrers across two small foam board supports. Add sandbag shapes from rolled putty (Green Stuff, Milliput, or even air-dry clay). Paint in brown and tan tones.
Crates and containers: Cut small cubes from foam board or balsa wood. Score plank lines on the surface. Paint in brown wood tones with metal corner details. Stack in groups of 2-4 for objective markers or scatter terrain.
Industrial pipes: Pen tubes, straws, and plastic pipe offcuts make excellent industrial terrain when painted in metallic colours with rust weathering. Glue pipes to foam board bases in clusters or running across the table.
Tank traps and hedgehogs: Cross three cocktail sticks at right angles and glue at the centre. Paint gunmetal grey with rust. These look great scattered across no-man’s-land.
Craters: Press a round object (ball, cup) into wet plaster or air-dry clay spread on a base. When dry, paint the crater interior dark with brown-black tones and the rim in your table’s ground colour. Craters are useful gameplay elements and easy to mass-produce.
How Does DIY Terrain Compare to GW Terrain?
Games Workshop terrain kits (Sector Mechanicus, Sector Imperialis, Orruk Warclans terrain) are beautifully detailed plastic kits that look outstanding when assembled and painted. They’re also expensive — a full table of GW terrain costs £200-400, and even a single ruin kit runs £30-50.
DIY terrain advantages: dramatically cheaper (full table for £20-50), unique and characterful, custom-sized for your gaming table, and the building process is an enjoyable hobby. DIY terrain also lets you create specific terrain types (trenches, bunkers, bridges, forests) that GW doesn’t produce in plastic.
GW terrain advantages: consistent high detail, designed to integrate with Warhammer aesthetics, sturdy plastic construction, and impressive visual impact with minimal building skill required. GW terrain also has official matched play rules and dimensions designed for tournament balance.
Many players combine both: GW terrain as centrepiece features with DIY terrain filling out the rest of the table. This provides the visual impact of GW plastic where it matters most while keeping the total investment reasonable.
Frequently Asked Questions
What is the cheapest way to make Warhammer terrain?
Cardboard from delivery boxes, PVA glue, and sand give you the absolute cheapest terrain — essentially free. Foam board from pound shops (£1-2 per sheet) is the next step up and produces much sturdier, better-looking results. A hot glue gun (£5-8) makes assembly dramatically faster. With £10-15 in materials, you can build enough terrain for a full 6×4 gaming table.
Do you need to prime terrain before painting?
Yes, especially foam board and polystyrene terrain. A PVA seal coat followed by spray primer provides a proper surface for paint adhesion. Without primer, acrylic paint can peel off smooth surfaces. Cheap hardware-store spray paint works fine for terrain priming — you don’t need hobby-grade primer.
How long does it take to build a table of terrain?
A complete set of terrain for a Warhammer gaming table (6-10 pieces including ruins, hills, and scatter) takes approximately 10-20 hours spread over several sessions: cutting and assembly (4-8 hours), texturing and priming (2-4 hours), and painting (4-8 hours). Working in batches — building all pieces first, then texturing all at once, then painting — is more efficient than completing one piece at a time.
What type of terrain is most important for Warhammer?
Line-of-sight blocking terrain (ruins with intact walls, buildings, large hills) is the most important type. Without LOS-blocking terrain, shooting armies dominate and melee armies cannot close the distance. Aim for at least 4-6 pieces of LOS-blocking terrain on a standard 60×44 inch table, supplemented by area terrain (craters, barricades, forests) that provides cover without fully blocking sight lines.
Can you use MDF terrain kits instead of DIY?
MDF (laser-cut wood) terrain kits from companies like TTCombat, 4Ground, and Sarissa Precision offer a middle ground between DIY and GW terrain. They’re cheaper than GW plastic (£10-25 per building), come pre-cut for easy assembly, and produce sturdy, detailed results. MDF terrain needs painting to look its best (unpainted MDF has a distinctive brown laser-cut appearance), but it’s an excellent option for players who want good terrain without the time investment of full DIY construction.
How do I make cheap forests for Age of Sigmar or 40k?
Glue model railway trees, aquarium plastic plants or bottle-brush trees onto a flat base cut from MDF, card or foam board. Texture the base with sand and PVA and paint it in earthy tones. Try to make the trees removable so models can stand inside the wood. A clearly defined base shows exactly where the forest’s area starts and ends for rules purposes.
Is it safe to cut foam with a hot wire cutter?
Yes, if you work in a well-ventilated area. Melting XPS or polystyrene foam gives off fumes you shouldn’t breathe in. Open a window or work outdoors, keep the wire at the lowest temperature that cuts cleanly and don’t let it smoulder. A sharp hobby knife or saw is a fume-free alternative for straight cuts.
Related Content
- How to Play Warhammer 40k — Complete Beginner’s Guide — beginner guide to Warhammer 40K
- How Does Morale Work in Warhammer 40k? — Battle-shock Explained — related content on a similar topic
- What Are Stratagems in Warhammer 40k? — Rules Guide — related content on a similar topic
- How Does Combat Work in Warhammer 40k? — Rules Explained — related content on a similar topic