
Part of our Fyreslayers & Khazalite Holds hub: every Fyreslayers & Khazalite Holds guide, lore page and painting tutorial in one place.
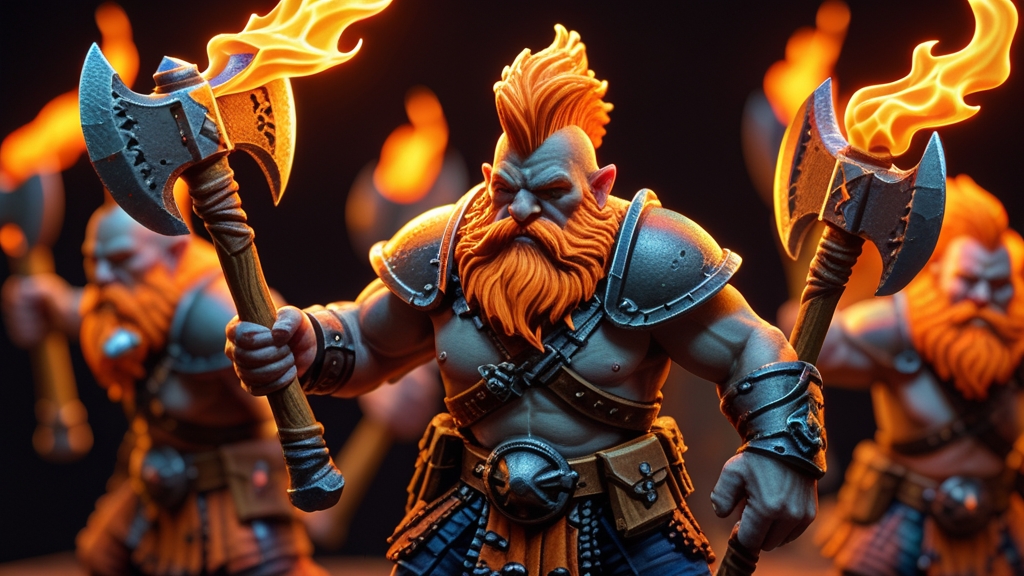
Learning how to paint Fyreslayers is a rewarding Age of Sigmar project: the duardin slayers are mostly bare skin, bright orange hair and a lot of gold, so a small paint list goes a long way. This guide covers the paints and tools you need, a step-by-step method for the classic studio look (flame-orange hair and beards, flesh-toned skin covered in glowing ur-gold runes, and golden armour and weapons), plus speed-painting tips and advice for heroes and Magmadroths.
Essential Paints and Tools for Fyreslayers
Before you begin, gather everything for the classic scheme. Fyreslayers have three main areas to paint: skin, hair and gold. Get those three looking good and the rest is detail.
Citadel Paint List
- Primer: Chaos Black or Mechanicus Standard Grey for a traditional finish; Wraithbone if you plan to use Contrast paints on the skin and hair
- Skin: Bugman’s Glow base, Reikland Fleshshade wash, Cadian Fleshtone and Kislev Flesh highlights
- Hair and beards: Troll Slayer Orange base, Fuegan Orange or Reikland Fleshshade in the recesses, Fire Dragon Bright highlights
- Gold armour, weapons and runes: Retributor Armour base, Reikland Fleshshade or Agrax Earthshade wash, Liberator Gold highlight, a touch of Stormhost Silver on the sharpest edges
- Weapon blades and steel: Leadbelcher, Nuln Oil, Stormhost Silver
- Leather and hafts: Mournfang Brown, Agrax Earthshade, Baneblade Brown
- Basing: Astrogranite Debris with a Tyrant Skull or light grey drybrush, or a dark volcanic base with orange “lava” cracks to match a Magmadroth
Recommended Tools
- Brushes: A Size 1 Layer brush for detail work, a Medium Base brush for larger areas, and a Medium Dry brush for drybrushing
- Palette: A wet palette keeps skin tones workable for longer, which helps when you’re blending flesh highlights
- Water pot: Two pots — one for rinsing, one with clean water for thinning paints
- Hobby knife and clippers: For cleaning mould lines before you prime
- Plastic glue or super glue: Plastic glue for the multi-part kits, super glue for small fiddly parts
Step-by-Step Painting Guide: Classic Fyreslayers Scheme
We’ll use Vulkite Berzerkers as the reference model, but the same steps work for any unit in the range. Each step builds on the last, so follow the order.
Step 1: Preparation and Priming
Assemble your miniatures and clean the mould lines with a hobby knife. Fyreslayers have a lot of bare muscle, so mould lines across chests, arms and faces are very visible on the finished model. Consider leaving shields and any parts that cover the torso off until painted, so you can reach the skin and runes underneath.
Prime in short bursts from about 20 to 30 cm away, rotating the model between passes. Two thin coats are better than one heavy coat. A dark or grey primer gives the gold a richer, deeper look; Wraithbone is the better choice if you’re using Contrast paints. Let the primer dry fully before handling.
Step 2: Base Colours
Work from the largest areas to the smallest. Thin your paints with a little water until they flow smoothly without visible brushstrokes, and aim for two thin coats rather than one thick one.
Start with the skin in Bugman’s Glow, covering all exposed flesh. Next, paint the gold — armour, helmets, weapons, the ur-gold runes and any jewellery — in Retributor Armour. Then paint the hair, beards and crests in Troll Slayer Orange; over a dark primer you may need an undercoat of a darker orange or a third thin coat for full coverage. Finish with the steel blades in Leadbelcher and any leather straps in Mournfang Brown.
Step 3: Washes and Shading
Apply Reikland Fleshshade to the skin and the gold, and Nuln Oil to the steel. Reikland Fleshshade over Retributor Armour gives a warm, reddish gold that suits the fiery theme; Agrax Earthshade gives a browner, more subdued gold. Shade the orange hair with a little Fuegan Orange or Reikland Fleshshade in the deepest recesses so the strands stay bright.
For tabletop standard, an all-over wash on skin and gold works well and saves time. Use a clean, damp brush to wick away pooling on flat surfaces such as the chest and back. Let the wash dry completely — at least 15 to 20 minutes — before moving on.
Step 4: Layering and Highlighting
Bring the brightness back with Cadian Fleshtone on the raised muscles, knuckles, cheekbones and nose, then a finer Kislev Flesh highlight on the very highest points. Highlight the hair with Fire Dragon Bright along the top strands of the beard and crest. Edge-highlight the armour and weapons with Liberator Gold, and add a few dots or short lines of Stormhost Silver on the sharpest corners.
Build highlights up gradually — it’s easier to add more than to take it back. Concentrate on upper edges and raised details so the model reads clearly at arm’s length.
Step 5: Ur-Gold Runes and Details
The ur-gold runes hammered into Fyreslayer flesh are the faction’s signature detail. Paint them as gold set into the skin: Retributor Armour, a sepia or brown wash, then a Liberator Gold highlight on the raised edges. For a hotter, magical look, glaze a little orange into the skin right around each rune so it seems to glow. Keep the skin around the runes clean — a tidy line where gold meets flesh makes them pop.
For weapons, base the blades with Leadbelcher, wash with Nuln Oil, and highlight the cutting edges with Stormhost Silver. Wooden hafts and leather can be painted Mournfang Brown, washed with Agrax Earthshade and highlighted with Baneblade Brown. Eyes, teeth and any gems are the last small touches.
Step 6: Basing
Apply Astrogranite Debris and drybrush it with Tyrant Skull or a light grey for a simple rocky base. For a volcanic look that ties in with Magmadroths, use a dark texture, then paint thin cracks orange and yellow so they look like lava. Finish the rim in Abaddon Black or Steel Legion Drab.
Tufts, small rocks and ash-grey drybrushing can add interest. The base should complement the bright orange and gold without competing with them.
Varying the Scheme for Your Own Lodge
Fyreslayers are organised into lodges, and the Fyreslayers battletome shows official colour schemes for several of them, so check it if you want to match a specific lodge from the background. If you’d rather invent your own, the usual approach is to keep the orange hair — it’s the faction’s signature, symbolising the fire of their god Grimnir — and change one of the other elements:
- The metal: swap gold for a bronze or copper (such as Balthasar Gold or Hashut Copper) or a darker, blackened gold to make your lodge distinct while the runes stay bright
- The skin tone: any natural flesh tone works; deeper skin tones make the gold runes and orange hair stand out even more
- The accents: pick a single spot colour for cloth, shields or gems to identify your lodge across every unit
Whatever you choose, keep strong contrast between skin, hair and metal so the models don’t read as one flat colour at gaming distance.
Speed Painting Fyreslayers for Tabletop Standard
Contrast paints and batch painting are your best friends if you want an army on the table quickly. Prime with Wraithbone, then use a Contrast flesh tone such as Guilliman Flesh or Darkoath Flesh for the skin and Gryph-hound Orange for the hair. Contrast paints don’t do metallics, so paint the gold traditionally with Retributor Armour and a Reikland Fleshshade wash.
Work on 5 to 10 models at a time, applying the same colour to every model before moving to the next. After the base colours and washes are dry, a quick Liberator Gold drybrush on the armour, a Fire Dragon Bright highlight on the beards and basic basing will get your models to a solid tabletop standard. You can always come back and add edge highlights later. A fully painted army at tabletop standard looks better on the battlefield than a handful of perfect models next to grey plastic.
Painting Fyreslayers for Different Unit Types
Battleline and Infantry: Units like Vulkite Berzerkers benefit most from batch painting. Focus on clean skin, bright hair and well-washed gold. Save detailed edge highlighting for characters — a consistent standard across the whole unit looks better than a few showpieces next to unfinished models.
Heroes and Characters: Spend extra time on your Runefathers, Runesons and Runesmiters. Add extra highlight layers to the skin, take care with the runes, and give the face and beard the most attention. A well-painted general makes the whole army look better.
Magmadroths: Treat the beast as cooling lava. Paint the scaly hide a dark grey, brown or black, then pick out the cracks and the flames along its back with orange and yellow, keeping the brightest yellow deepest in the recesses. A light drybrush on the scales and some ash-grey on the edges sell the effect. An airbrush helps with smooth gradients on the flames, but it isn’t required.
Frequently Asked Questions
What primer should I use for Fyreslayers?
For a traditional finish, Chaos Black or Mechanicus Standard Grey gives the gold a rich, deep look and still lets the skin and orange hair cover well in two or three thin coats. If you plan to use Contrast paints for the skin and hair, prime with Wraithbone or Grey Seer instead, because Contrast paints need a light undercoat to show their colour.
How long does it take to paint a Fyreslayers army?
It depends on the army and your experience, but as a rough guide a full matched-play army takes most painters several dozen hours to reach tabletop standard. Batch painting and Contrast paints can cut that substantially. An infantry model typically takes an hour or two; a hero or Magmadroth can take many hours depending on the detail you’re aiming for.
Can I use Contrast paints for the entire Fyreslayers army?
For most of it, yes. Contrast flesh tones and Gryph-hound Orange work well on the skin and hair over a Wraithbone primer. The gold armour, weapons and runes still need traditional metallic paints, since there are no metallic Contrast paints. This hybrid approach gives you speed without sacrificing quality.
What are the best brushes for painting Fyreslayers?
A Size 1 detail brush handles most of the work, including edge highlighting and the runes. A Size 0 or 00 is useful for eyes and the finest details. A Medium Base brush speeds up large areas of skin, and a Medium Dry brush is handy for beards and bases. A good sable detail brush holds its point far longer than a cheap synthetic one.
How do I strip paint from Fyreslayers models if I make a mistake?
Soak your plastic models in isopropyl alcohol (90 percent or higher) or a dedicated miniature paint stripper for several hours or overnight, then scrub gently with an old toothbrush. This removes acrylic paint without damaging the plastic. Always test on a spare part or sprue first if you’re unsure about a product.
Should I varnish my painted Fyreslayers models?
Yes, for any models you’ll use in games. Apply Munitorum Varnish spray or a brush-on matt varnish to protect your paintwork from handling and transport. Matt varnish dulls metallics slightly, so many painters apply a gloss varnish first for durability, then a matt coat on the skin and hair, leaving the gold with a little shine.
Ready to explore more about this faction? Check out our comprehensive Fyreslayers army guide for tactics, army lists, and competitive strategies to complement your newly painted army.
What colour is Fyreslayers hair?
Bright orange. The classic studio look gives Fyreslayers flame-orange hair, crests and beards, bare flesh-toned skin covered in glowing ur-gold runes, and golden armour and weapons. The orange hair is the Fyreslayers’ signature, symbolising the fire of their god Grimnir, so most schemes keep it even when the armour or skin tones change.
How do I paint the ur-gold runes?
Paint the runes as gold set into the skin: a rich gold such as Retributor Armour, a brown or sepia wash, then a brighter gold highlight. For a hotter, magical look, glaze orange around each rune so it looks as though it’s glowing. The runes are hammered into Fyreslayer flesh in the lore, so they should read clearly against the skin.
How do I paint a Magmadroth?
Treat it as cooling lava. Paint the scaly hide a dark grey, brown or black, then pick out the cracks and the flames along its back with orange and yellow, keeping the brightest yellow deepest in the recesses. A light drybrush on the scales and some ash-grey on the edges make it look as if it is cooling from the inside.
Related Content
- Warhammer Painting for Beginners — Everything You Need — essential painting guide for new hobbyists
- Best Paints for Warhammer — Complete Comparison Guide — recommended paints for Warhammer miniatures
- Object Source Lighting (OSL) — Complete Miniature Painting Guide — related painting technique and tutorial
- Drybrushing Tutorial — Fast Painting for Warhammer — popular drybrushing technique tutorial