
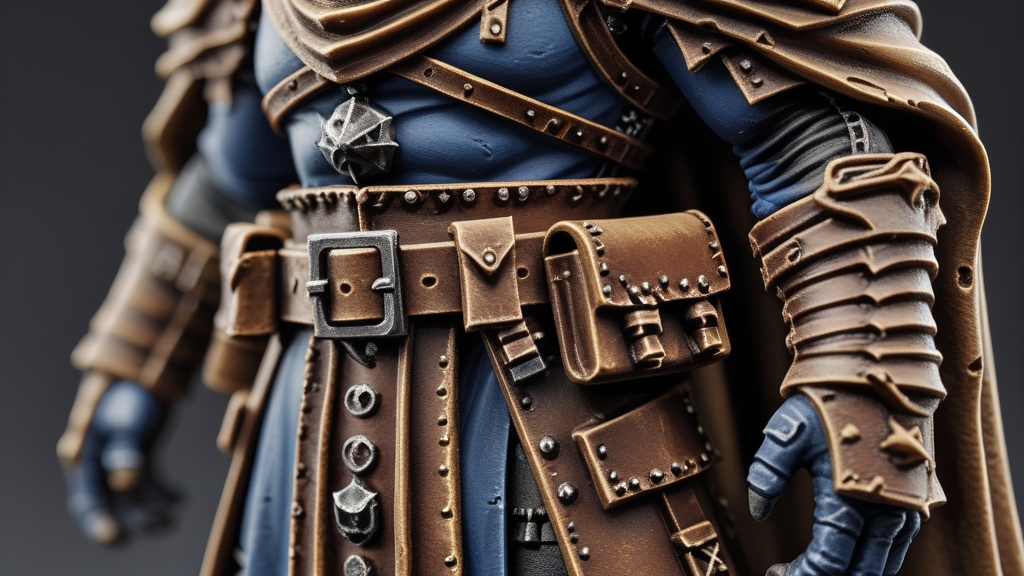
Paint leather with Rhinox Hide or XV-88, wash with Agrax Earthshade, and highlight with Baneblade Brown and Karak Stone. For cloth, use your chosen colour washed with a matching shade, then layer back up leaving the recesses dark.
Leather and cloth are two of the most common materials you will encounter when painting Warhammer miniatures. Almost every model has some combination of leather straps, pouches, belts, holsters, boots, tabards, cloaks, or fabric wrappings. Getting these materials to look convincing — and distinct from each other — is essential for a well-painted miniature.
This guide covers techniques for painting multiple types of leather and cloth, from quick tabletop methods to more advanced approaches. We will focus on making leather look like leather and cloth look like cloth, because the single biggest improvement you can make to your painting is differentiating between materials on the same model.
Understanding the Difference Between Leather and Cloth
Before picking up a brush, it helps to understand what makes leather and cloth look different in reality. This understanding will inform every painting decision you make.
Leather is a stiff, smooth material with a slight sheen. It creases in angular, defined folds rather than flowing curves. Worn leather develops surface texture — scuffs, scratches, and areas where the surface has been worn smooth. Leather highlights tend to be sharper and more defined, with a tighter transition between light and shadow. Think of the crisp fold lines on a leather belt or the smooth surface of a holster.
Cloth is a soft, flexible material that drapes and flows. Its folds are rounder and more organic than leather’s angular creases. Cloth does not have a sheen (unless it is silk or satin). Cloth highlights tend to be broader and more gradual, with smoother transitions between light and shadow. Think of the flowing folds of a cloak or the soft drape of a tabard.
On a miniature, you convey these differences through your choice of colours, the placement of highlights, and the style of your brushwork. Leather gets sharp, defined highlights on angular creases. Cloth gets broader, softer highlights on the peaks of flowing folds.
How to Paint Dark Brown Leather
Dark brown leather is the most common type you will paint — it appears on belts, pouches, holsters, boot straps, and weapon grips across almost every faction in both Warhammer 40k and Age of Sigmar.
Step 1 — Basecoat with Rhinox Hide. Rhinox Hide is a dark, rich brown that perfectly captures the look of well-used dark leather. Apply one or two thin coats for even coverage. This dark starting point is important; it gives the leather a sense of depth and richness that lighter browns cannot match.
Step 2 — Wash with Agrax Earthshade. Apply a coat of Agrax Earthshade over the entire leather area. The wash will deepen the shadows in the recesses and add a subtle variation in tone across the surface. On leather, the wash should be applied more sparingly than on fabric — leather does not absorb liquid the way cloth does, so the shadows should be more controlled.
Step 3 — Layer with Mournfang Brown. Apply Mournfang Brown to the raised areas and flat surfaces of the leather, leaving Rhinox Hide visible in the recesses and undersides. This creates the first level of contrast that defines the leather’s three-dimensional form.
Step 4 — Highlight with Skrag Brown or Baneblade Brown. Apply a narrower highlight to the edges of straps, the tops of buckles, and the creased edges of pouches. These highlights should be fairly sharp and defined — remember, leather creases in angular lines, not soft curves.
Step 5 — Fine highlight with Karak Stone. Apply a very fine edge highlight of Karak Stone to the absolute edges and corners — the tips of buckle tongues, the edges of belts where they would catch the most light, and the raised stitching details. This final highlight makes the leather pop on the tabletop.
How to Paint Tan or Light Brown Leather
Tan leather has a different character from dark leather. It looks newer, lighter, and often suggests a different type of hide or tanning process. Tan leather works well for pouches, water skins, book covers, map cases, and equipment that would be made from lighter, more supple leather.
Step 1 — Basecoat with XV-88. XV-88 is a warm tan brown that works perfectly as a base for light leather. It is warm enough to look organic without being so dark that it loses its light character.
Step 2 — Wash with Agrax Earthshade. Apply a controlled wash, focusing on the recesses. For light leather, you want to avoid flooding the wash across the entire surface, as this will darken it too much and lose the tan character. Target the creases, edges, and underside shadows specifically.
Step 3 — Layer with Balor Brown. Re-establish the tan tone on the raised surfaces with Balor Brown, leaving the wash visible in the shadows. Balor Brown is slightly lighter and warmer than XV-88, providing a natural-looking highlight.
Step 4 — Highlight with Karak Stone. Apply edge highlights of Karak Stone to the creases and edges of the leather. This pale, sandy highlight works brilliantly on tan leather, suggesting the worn, sun-bleached look of well-used equipment.
Step 5 — Fine highlight with Screaming Skull. A tiny dot or line of Screaming Skull on the very sharpest edges adds the final point of definition. Use this sparingly — a little goes a long way on light-coloured leather.
How to Paint Black Leather
Black leather appears on Commissar coats, Space Marine holsters, Dark Eldar armour, and many other models. Painting convincing black leather is challenging because you need to create visible highlights without making the leather look grey.
Step 1 — Basecoat with Abaddon Black. Start with a solid, even coat of pure black.
Step 2 — Wash with Nuln Oil. This may seem redundant on a black basecoat, but the wash adds subtle depth to the recesses and creates a satin finish that looks more like leather than flat black paint.
Step 3 — Edge highlight with Dark Reaper or Eshin Grey. Apply sharp, defined highlights to the edges and creases. The key to black leather is keeping these highlights very narrow and precise — wide highlights will make the leather look grey rather than black.
Step 4 — Fine highlight with Thunderhawk Blue or Mechanicus Standard Grey. An extremely fine line of a slightly lighter colour on the very highest edges adds definition without compromising the overall black appearance. Using a blue-tinted grey like Thunderhawk Blue gives the leather a cool, sophisticated sheen.
How to Paint Cloth and Fabric
Cloth is painted differently from leather because it behaves differently. Where leather creases sharply, cloth drapes softly. Where leather has a slight sheen, cloth is matte. Your painting technique needs to reflect these differences.
The fundamental approach to painting cloth is the same regardless of colour: basecoat, shade, layer, highlight. What changes is the way you apply these steps.
Placement of shadows and highlights. On cloth, shadows collect in the deepest folds and creases, where the fabric bunches together. Highlights appear on the peaks of folds, where the fabric catches the light. Look at the sculpt carefully before you start painting — the sculptor has already defined where the folds are, so use the sculpt as your guide.
Smooth transitions. Cloth highlights should transition smoothly from shadow to light, without the sharp lines that characterise leather. This can be achieved through thin glazes, wet blending, or careful layering with gradually lighter tones. The goal is a gradual gradient from dark in the recesses to light on the peaks.
Matte finish. Cloth should not have any sheen or gloss. If your paint has a natural sheen, a coat of matte varnish will fix this. The only exception is silk or satin fabric, which should have a subtle sheen on the highlights — but this is rare on Warhammer miniatures.
How to Paint Red Cloth
Red cloth is one of the most common fabric colours in Warhammer, appearing on Space Marine tabards, Imperial Guard uniforms, Khorne devotee robes, and many more.
Step 1 — Basecoat with Khorne Red. This deep, rich red provides an excellent foundation for cloth. It is dark enough to provide natural shadow and rich enough to read as a strong, saturated red.
Step 2 — Wash with Agrax Earthshade or Carroburg Crimson. Use Agrax for a warmer, more muted shadow (good for natural-looking cloth), or Carroburg Crimson for a more saturated shadow that keeps the red vibrant. Apply the wash into the folds and recesses.
Step 3 — Layer with Evil Sunz Scarlet. Apply Evil Sunz Scarlet to the raised folds of the cloth, leaving the darker wash visible in the deepest recesses. Work in thin layers, building up the coverage gradually for a smooth transition.
Step 4 — Highlight with Wild Rider Red. Apply narrower highlights of Wild Rider Red to the peaks of the folds — the areas where the cloth would catch the most light. These highlights should be broader and softer than leather highlights.
Step 5 — Fine highlight with Fire Dragon Bright (optional). A tiny edge highlight or dot of Fire Dragon Bright on the very highest points adds a final pop. Use this very sparingly — too much bright orange-red will make the cloth look unnatural.
How to Paint White Cloth
White cloth is notoriously difficult to paint because pure white leaves no room for highlights. The solution is to not start with white — instead, start with grey and build up to white.
Step 1 — Basecoat with Celestra Grey or Grey Seer. This pale grey provides the midtone of your white cloth. It looks grey now, but once you add shadows and highlights, it will read as white on the tabletop.
Step 2 — Wash with a thinned Nuln Oil or Apothecary White Contrast. Apply a very thin wash into the folds only. You want subtle shadows, not dark grey lines. Control is essential here — too much wash will ruin the clean white appearance.
Step 3 — Layer with Ulthuan Grey. Apply Ulthuan Grey to the raised folds, establishing the light tone that will read as white from a distance.
Step 4 — Highlight with White Scar. Apply pure white to the peaks of folds and the most prominent edges. This is where your cloth will look its brightest and cleanest.
How to Paint Worn and Weathered Cloth
Not all cloth is clean and pristine. Battle-worn tabards, ragged cloaks, and stained robes need a different approach to look convincing.
After completing your basic cloth recipe, add weathering effects. Stipple a darker shade into the lower edges of cloaks and tabards to suggest dirt and mud. Use a thin wash of Agrax Earthshade on specific areas — the hem, around the waist, on the elbows and knees — to suggest wear and grime. For torn edges, apply a thin line of a lighter colour along the torn edge to suggest frayed fabric.
For bloodstained cloth, apply Blood for the Blood God technical paint to localised areas, letting it flow into the creases of the fabric to suggest absorbed blood. For oil-stained cloth (common on Mechanicus and industrial models), apply small amounts of Nuln Oil Gloss to specific areas.
How to Make Leather and Cloth Look Different on the Same Model
This is the most important technique in this entire guide. Many models have both leather and cloth, and making them visually distinct is essential for a convincing paint job.
The key strategies are choosing different colour temperatures (warm brown leather against cool blue cloth), using different highlight styles (sharp edges for leather, broad folds for cloth), applying different finishes (slight satin for leather, matte for cloth), and maintaining different levels of contrast (higher contrast for leather, subtler for cloth).
Even if you paint both materials in similar colours, varying the highlight style alone will create a clear visual distinction. Sharp, angular highlights say “leather.” Broad, smooth highlights say “cloth.” Your viewer’s eye will pick up on this difference even if they cannot articulate why.
Frequently Asked Questions
What is the fastest way to paint leather on a batch of models?
Basecoat with Rhinox Hide, wash with Agrax Earthshade, and dry brush with Mournfang Brown. This three-step method is fast enough for batch-painting and produces perfectly acceptable tabletop results. Skip the fine highlights for rank-and-file troops and save the detailed work for characters and heroes.
Can I use Contrast paints for leather?
Yes. Cygor Brown or Snakebite Leather Contrast paints over a Wraithbone primer produce excellent leather effects with a single coat. The Contrast paint will naturally create shadows in the recesses and lighter tones on the raised areas. For best results, apply a quick dry brush or edge highlight after the Contrast paint dries.
How do I paint fabric patterns like checks or stripes?
Paint the base cloth colour first, then use a fine brush to apply the pattern over the top. For checks, paint horizontal lines first, let them dry, then paint vertical lines. For stripes, follow the contours of the folds — the stripes should bend and curve as the fabric bends and curves. This is advanced work, so practice on a spare model first.
How do I make leather look wet or oiled?
Apply a thin coat of Ardcoat or gloss varnish to the leather areas after painting. The glossy finish suggests a wet or oiled surface. For a more subtle effect, mix a small amount of gloss varnish into your final highlight colour — this gives a satin sheen rather than a full gloss.
Should leather and cloth be different colours on the same model?
Ideally, yes. Using different colours makes the distinction immediately obvious and helps the viewer’s eye read the different materials. If you must use similar colours (for example, brown leather and brown cloth), make sure to vary the shade — use a darker brown for leather and a lighter brown for cloth, or vice versa — and apply different highlight techniques to maintain the distinction.
How do you paint worn or scuffed leather on miniatures?
Paint the leather as normal, then add wear with a pale brown or bone colour such as Karak Stone applied as tiny scratches and broken lines along edges and creases. Stippling or sponging the highlight colour onto raised areas gives a scuffed texture. A light glaze of the original brown over the top blends the damage so it looks worn rather than painted on.
How do you paint buckles and stitching on leather straps?
Paint buckles last with a metallic such as Leadbelcher or a gold like Retributor Armour, then wash with Nuln Oil or Reikland Fleshshade to define them. For stitching, use a fine brush and a pale tan or bone colour to dot or dash along sculpted seams. Keep it subtle; tiny contrast details like these sell leather on the tabletop.
Related Content
- Warhammer Painting for Beginners — Everything You Need — start with painting fundamentals
- Best Paints for Warhammer — Complete Comparison Guide — choose the right paints for your models
- How to Paint Cloaks and Fabric — Cloth Techniques — learn a related painting technique