
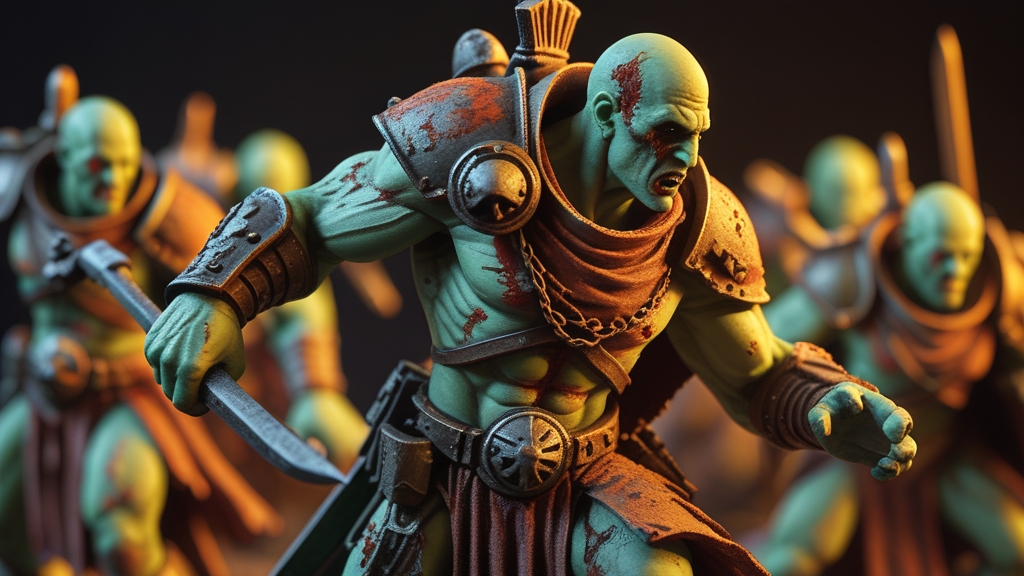
Part of our Maggotkin of Nurgle hub: every Maggotkin of Nurgle guide, lore page and painting tutorial in one place.
This guide shows you how to paint Maggotkin of Nurgle in the classic sickly green, rust and bone scheme, using paints that are all in the current Citadel range. It covers the paint list, a step-by-step method built around Plaguebearers and Putrid Blightkings, how to do rust, slime and Nurgle’s Rot properly, and three alternative palettes with actual paint recipes. Everything here works at tabletop standard and scales up if you want to push your heroes further.
Essential Paints and Tools for Maggotkin of Nurgle
Nurgle armies are forgiving to paint. Heavy shading, rust and grime are part of the look, so a messy wash or an uneven drybrush rarely ruins a model. This is the paint list for the classic scheme.
Citadel Paint List
- Primer: Death Guard Green (spray), or Wraithbone (spray) if you want to use Contrast for the skin
- Skin: Death Guard Green base, or Plaguebearer Flesh Contrast over Wraithbone
- Armour and metal: Leadbelcher or Warplock Bronze, then Typhus Corrosion and Ryza Rust
- Horns and bone: Ushabti Bone, washed with Seraphim Sepia or Agrax Earthshade
- Wounds, tentacles and innards: Screamer Pink, then Pink Horror
- Shades: Athonian Camoshade for the skin, Agrax Earthshade for metal and cloth
- Highlights: Nurgling Green and Ogryn Camo for skin, Screaming Skull for bone
- Effects and basing: Nurgle’s Rot for slime, Stirland Battlemire for mud
Recommended Tools
- Brushes: A Size 1 Layer brush for detail work, a Medium Base brush for larger areas, and a Medium Dry brush for drybrushing
- Palette: A wet palette keeps paints workable over a long session, which helps when you’re mixing skin tones
- Water pot: Two pots, one for rinsing and one with clean water for thinning
- Hobby knife and clippers: For cleaning mould lines before you prime
- Plastic glue or super glue: Plastic glue for multi-part plastic kits, super glue for push-fit and resin parts
Step-by-Step Painting Guide: Classic Maggotkin of Nurgle Scheme
This method uses Plaguebearers and Putrid Blightkings as the reference models, but the same steps work across the range. Follow the order: each step builds on the last.
Step 1: Preparation and Priming
Assemble your models and clean the mould lines with a hobby knife. On Nurgle models they hide easily in the folds of flesh, so check bellies, arms and horns carefully. Consider leaving some parts off for painting: the riders of Plague Drones and Pusgoyle Blightlords are much easier to reach before they’re glued to their mounts, and the same goes for Blightking banners and icons.
Prime with Death Guard Green (spray). Use short bursts from roughly 20 to 30 cm away, turning the model between passes. Two thin coats are better than one heavy one. Let it dry fully before you handle the model. The green primer gives you a skin basecoat straight away.
Step 2: Base Colours
Thin your paints with a little water until they flow smoothly without leaving brushstrokes, and work from the largest areas to the smallest.
Tidy up the skin with Death Guard Green wherever the primer is patchy. Paint the armour and metal with Leadbelcher (or Warplock Bronze for a dirtier, older look). Base the horns, teeth and bone with Ushabti Bone and any cloth or leather with a brown such as Mournfang Brown. Finally, pick out wounds, tentacles and exposed innards with Screamer Pink. A smaller brush helps with these last details.
Step 3: Washes and Shading
Washes do most of the work on Nurgle models. Apply Athonian Camoshade over the skin and Agrax Earthshade over the metal, cloth and bone. You can either wash the whole model (faster, with natural shadows everywhere) or wash only the recesses (neater, and it keeps the base colour brighter on raised areas).
For tabletop standard, an all-over wash is fine and saves a lot of time. Let it flow into the recesses, and use a clean, damp brush to soak up any pooling on flat areas. Leave it to dry completely before moving on. Rushing this step is the most common mistake.
Step 4: Layering and Highlighting
Once the washes are dry, bring the brightness back. On the skin, layer Nurgling Green over the raised areas: bellies, boils, knuckles, brows and the tops of muscles. Add a finer highlight of Ogryn Camo on the very highest points. Bone gets a highlight of Screaming Skull towards the tips of horns and teeth, and the pink areas get a touch of Pink Horror.
Build up gradually. It’s easy to add more highlight and hard to take it away. Keep the metal mostly un-highlighted for now, because the rust in the next step will cover much of it.
Step 5: Rust, Slime and Nurgle’s Rot
These effects are what make the army look like Nurgle’s rather than anyone else’s.
Rust: Paint Typhus Corrosion over the Leadbelcher armour and blades, concentrating it in recesses, rivets and the lower edges of plates where grime would gather. When it’s dry, stipple or drybrush Ryza Rust over the same areas so bright orange flecks catch the light. To show the metal underneath, sponge a little Leadbelcher back onto worn edges and the cutting edges of weapons.
Slime and pus: Nurgle’s Rot is a Technical paint that dries as glossy, translucent green. Apply it in small blobs where liquid would collect: open wounds, mouths, drool, the tips of rusty blades and the gaps between armour plates. A thin glaze of Seraphim Sepia or Athonian Camoshade around a wound before the Rot goes on makes the flesh look inflamed.
Wooden hafts and handles: Mournfang Brown, washed with Agrax Earthshade and highlighted with Baneblade Brown, gives a quick but effective finish.
Step 6: Basing
A swampy base suits the army. Apply Stirland Battlemire to the base, then drybrush the raised parts with a lighter brown once it’s dry. Add small pools of Nurgle’s Rot in the low spots for a stagnant, sickly look. Paint the rim with Abaddon Black or Steel Legion Drab for a clean finish.
Swamp or dead-grass tufts, small rocks and the odd skull finish it off. Keep the base simpler than the model so it doesn’t compete for attention.
Alternative Colour Schemes for Maggotkin of Nurgle
The green-and-rust look isn’t the only option. These three palettes take their names from Nurgle hosts, but the recipes below are just suggestions. Follow the same order as the main guide (base, wash, highlight, effects) and swap in these paints.
Munificent Wanderers — bleached bone and verdigris
- Primer: Wraithbone
- Skin: Skeleton Horde Contrast, highlighted with Screaming Skull. Pale, bloodless flesh suits the scheme
- Armour: Balthasar Gold or Warplock Bronze, washed with Agrax Earthshade, then Nihilakh Oxide in the recesses for verdigris
- Accents: Screamer Pink for wounds, Nurgle’s Rot for slime
Blessed Sons — deep brown and sickly yellow
- Primer: Wraithbone or Grey Seer
- Skin: Iyanden Yellow Contrast, shaded in the deepest folds with Seraphim Sepia and highlighted with Flash Gitz Yellow mixed with Wraithbone
- Armour and cloth: Rhinox Hide or Mournfang Brown, washed with Agrax Earthshade, with Typhus Corrosion and Ryza Rust on the metal
- Contrast tip: keep the browns dark and the yellows bright. If they get too close in tone, the model reads as a flat blob at gaming distance
Drowned Men — waterlogged blue-green
- Primer: Grey Seer
- Skin: a thinned blue-green Contrast such as Akhelian Green, or Sotek Green layered up to Temple Guard Blue for a bloated, drowned look
- Shade: Coelia Greenshade in the recesses
- Armour: Leadbelcher, then Typhus Corrosion and a little Nihilakh Oxide so it looks waterlogged rather than just rusty
- Effects: a gloss varnish on skin folds and plenty of Nurgle’s Rot make the model look freshly pulled from the water
Speed Painting Maggotkin of Nurgle for Tabletop Standard
Need an army on the table quickly? Contrast paints and drybrushing are your best friends, and the Nurgle look hides the shortcuts well.
Prime with Wraithbone and apply Plaguebearer Flesh Contrast to the skin. Paint the metal with Leadbelcher and go straight to Typhus Corrosion, then pick out the horns with Skeleton Horde Contrast. Batch-paint 5 to 10 models at once, applying one colour to every model before moving to the next.
When the Contrast is dry, a single drybrush highlight and simple basing get you to a solid tabletop standard. Drybrushing works especially well on textured skin, rusty armour, tattered cloth and rocky bases. Dot Nurgle’s Rot into wounds and mouths as the final touch. You can always go back for extra detail later. A fully painted army looks better on the table than a few perfect models next to grey plastic.
Painting Maggotkin of Nurgle for Different Unit Types
Different parts of the range need different amounts of time.
Battleline and infantry: Units like Plaguebearers and Putrid Blightkings suit batch painting. Focus on clean base colours and strong washes, and save detailed highlighting for characters. When you have 20 or more infantry to paint, efficiency matters most. A consistent standard across the unit looks better than a few highly detailed models next to unfinished ones.
Heroes: Spend extra time on your heroes. Opponents look at them most closely. Add extra highlight layers, glaze the skin to make it look blotchy and diseased, and give extra attention to faces, open wounds and weapons.
Monsters and centrepieces: Large models such as Great Unclean Ones and the Glottkin have big areas of skin. Basecoat, wash and drybrush them for efficiency, then refine the focal points with layering: the face, the belly wound and any open sores. An airbrush helps here for smooth basecoats and gradients, such as a sickly yellow fading into green across a bloated belly.
Frequently Asked Questions
What primer should I use for Maggotkin of Nurgle?
Death Guard Green (spray) is the easiest primer for the standard pale green and rust scheme, because it gives you the skin basecoat in one step. If you plan to use Contrast paints for the skin, prime with Wraithbone or Grey Seer instead. Chaos Black suits darker alternative schemes.
How long does it take to paint a Maggotkin of Nurgle army?
It depends heavily on your army and experience. As a rough guide, a single infantry model takes around 1 to 2 hours at tabletop standard and a large hero or monster can take 5 to 15 hours. Contrast paints and batch painting can cut the total time for an army roughly in half.
Can I use Contrast paints for the entire Maggotkin of Nurgle army?
Yes. Contrast paints suit Maggotkin well, especially over Wraithbone or Grey Seer, because the models are full of texture and recesses where the paint pools and shades naturally. Plaguebearer Flesh was made for exactly this faction. For the best results, combine Contrast with a drybrush highlight, metallic paints and Typhus Corrosion for the armour, and Nurgle’s Rot for the slime.
What are the best brushes for painting Maggotkin of Nurgle?
A Size 1 detail brush handles most of the work, including highlights and details. A Size 0 helps with eyes and the smallest boils. A Medium Base brush speeds up large areas, and a Medium Dry brush is essential for drybrushing. A good sable detail brush such as a Winsor and Newton Series 7 holds its point far longer than a synthetic one.
How do I strip paint from Maggotkin of Nurgle models if I make a mistake?
Soak plastic models in isopropyl alcohol (90 percent or higher) or a dedicated miniature paint stripper for 12 to 24 hours, then scrub gently with an old toothbrush. This removes acrylic paint without damaging the plastic. Resin models are more delicate, so use a gentler stripper. Always test on a spare part or a piece of sprue first if you’re unsure.
Should I varnish my painted Maggotkin of Nurgle models?
Yes, if you’ll be playing with them. A matte varnish, such as Munitorum Varnish spray or a brush-on matte, protects the paint from handling and transport. Matte varnish dulls Nurgle’s Rot and other glossy effects, so apply the Rot (or a spot of gloss varnish) after the matte coat to keep the slime looking wet.
Want to know more about the faction? Our Maggotkin of Nurgle army guide covers the army itself, including lists and how it plays.
What colour scheme is traditional for Maggotkin of Nurgle?
The classic look is sickly pale green-yellow skin, rusted and corroded bronze or iron armour, bone-coloured horns, and pink or purple for wounds and innards. Glossy slime from Nurgle’s Rot finishes it off. The models should look diseased, not clean, so heavy shading and weathering suit them.
What is the quickest way to paint Plaguebearer skin?
Prime with Wraithbone and apply Plaguebearer Flesh Contrast. Then drybrush or edge highlight with a pale green-cream, and dab Nurgle’s Rot into wounds and mouths for wet slime. That gets a whole unit of Plaguebearers to tabletop standard very quickly.
What is Nurgle’s Rot used for?
Nurgle’s Rot is a Citadel Technical paint that dries as glossy, translucent green slime. Use it on wounds, drool, open sores, weapon tips and in puddles on the base. Apply it in small blobs where liquid would collect. Keep it off large areas, where it can look like a mistake rather than pus.
Related Content
- Warhammer Painting for Beginners — Everything You Need — essential painting guide for new hobbyists
- Best Paints for Warhammer — Complete Comparison Guide — recommended paints for Warhammer miniatures
- Object Source Lighting (OSL) — Complete Miniature Painting Guide — related painting technique and tutorial
- Drybrushing Tutorial — Fast Painting for Warhammer — popular drybrushing technique tutorial