
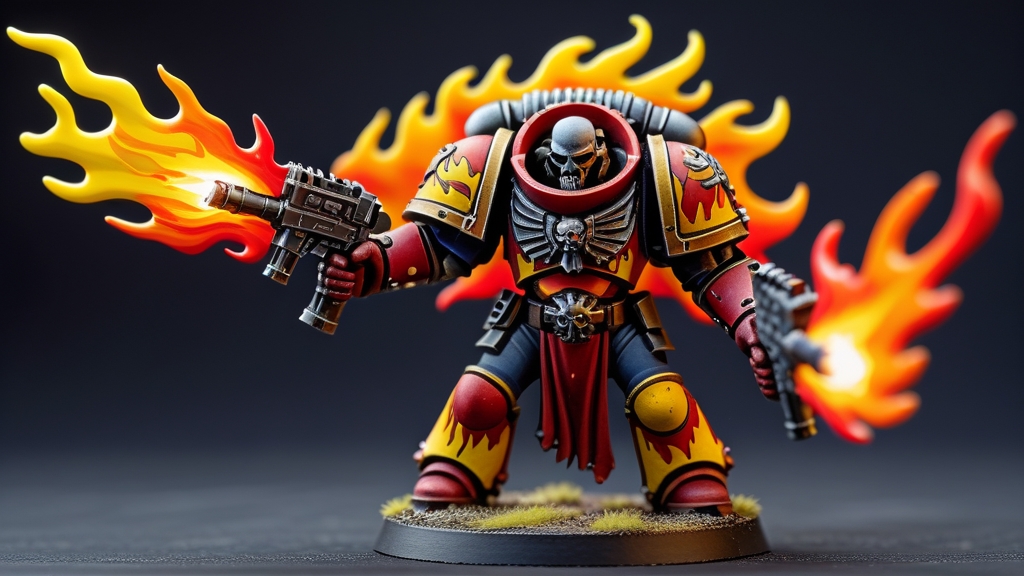
Paint flames in reverse order — start with white or yellow at the base and work up to orange and red at the tips. This creates a realistic heat gradient because the hottest part of a flame is at the bottom. It feels counterintuitive, but this reverse method is how every experienced miniature painter approaches flame effects.
Flames appear on torches, burning weapons, magical effects, vehicle exhausts, pyromantic spells, and countless other miniature details. Once you learn this one technique, you can apply it to any scale and any source — from a single candle to a blazing inferno across a Chaos vehicle.
This step-by-step guide covers the core reverse technique, colour selection, blending methods, different flame types, and how to add object source lighting (OSL) so your flames actually look like they’re casting light.
Why Do You Paint Flames in Reverse?
Real fire is hottest at its base and coolest at its tips. The hottest part of a flame glows white or bright yellow. As the fire rises and cools, it shifts through orange to red, and finally to dark red or black at the very edges where the flame meets the air.
Most beginners paint flames “logically” — yellow at the tips and red at the base. This produces a flame that looks flat and wrong because it reverses the actual temperature gradient. Even people who have never studied fire instinctively recognise when the values are inverted.
The reverse method also creates better visual contrast on a miniature. The bright white/yellow at the flame’s base (closest to the model’s surface) creates a natural focal point, while the darker red tips blend into the surrounding area. This makes the flame appear to glow from within.
What Colours Do You Need to Paint Flames?
You need four to five colours forming a gradient from cool-white through yellow and orange to red. Here are recommended colour sets from major paint ranges.
Citadel recipe (most accessible):
- White Scar (white core)
- Flash Gitz Yellow (bright yellow)
- Yriel Yellow (warm yellow)
- Troll Slayer Orange (orange)
- Evil Sunz Scarlet (red tips)
Vallejo recipe:
- Dead White (white core)
- Sun Yellow (bright yellow)
- Gold Yellow (warm yellow)
- Hot Orange (orange)
- Bloody Red (red tips)
Pro tip: If you have Citadel Contrast paints, you can speed up the blending by applying Iyanden Yellow Contrast over a white-primed flame shape, then glazing orange and red at the tips. The Contrast paint does most of the gradient work for you.
How Do You Paint Flames Step by Step?
This method works on any flame — from a torch to a flaming sword to a burning vehicle. Follow these steps in order.
Step 1: Basecoat the Entire Flame White
Paint the entire flame area with a solid white. Use 2-3 thin coats of White Scar or any white to achieve full, smooth coverage. This white base ensures your yellows and oranges are vibrant — yellow over a dark primer looks muddy and weak. White acts as both the base layer and the eventual hottest highlight at the flame’s core.
Step 2: Apply Yellow Over the Upper Two-Thirds
Starting from about one-third up from the base, apply bright yellow (Flash Gitz Yellow) over the rest of the flame upward to the tips. Leave the very bottom of the flame — where it meets the torch, weapon, or surface — white. Thin your yellow slightly so it transitions smoothly over the white beneath. The boundary between white and yellow should be soft, not a hard line.
Step 3: Apply Orange Over the Upper Half
Starting from the midpoint of the flame, apply orange (Troll Slayer Orange) upward to the tips. Again, thin the paint so the transition from yellow to orange is gradual. Work in thin layers — you can always add more orange to push the transition point lower, but you can’t easily undo it.
Step 4: Apply Red to the Tips
Apply red (Evil Sunz Scarlet) to just the tips and outermost edges of the flame. The red area should be the smallest zone — maybe the top quarter. If the flame has wispy tendrils reaching outward, those tips should all be red. The red is the coolest part of the flame and creates the visual boundary between fire and air.
Step 5: Refine the Blends
Go back and smooth any harsh transitions. Thin each colour heavily (3:1 or 4:1 water to paint) and glaze between colour zones. To soften the yellow-to-orange boundary, glaze thin yellow below the boundary and thin orange above it. The final result should show a smooth gradient from white at the base through yellow, orange, and red at the tips.
Step 6: Add Inner Highlights
Go back with white and repaint the very innermost core of the flame — the point where it emerges from the source. Also add thin white lines running up the centre of the flame to suggest the hottest column of gas. These highlights make the flame look genuinely incandescent rather than just colourful.
How Do You Blend Flames Smoothly?
Smooth blending is what separates a great flame from a decent one. There are three approaches ranked by difficulty.
Layering (easiest): Mix intermediate shades (e.g., yellow + orange = warm amber) and paint thin bands of these mixes between your main colours. The more intermediate shades you add, the smoother the gradient. Five layers looks better than three, seven looks better than five. Use thin paint and build up gradually.
Glazing (intermediate): Apply your base colours in blocks, then use very thin glazes (5:1 water to paint) to blend the boundaries. Pass a thin glaze of yellow over the yellow-orange border, let it dry, then pass a thin glaze of orange over the same area. Repeat until the transition is seamless. This is the most forgiving method because each glaze makes a tiny, controllable change.
Wet blending (advanced): Apply two adjacent colours while both are still wet and blend them together on the miniature with a clean, damp brush. This produces the smoothest gradients but requires speed and confidence. Adding a drop of retarder medium to your paint extends drying time and makes wet blending much easier.
How Do You Paint Different Types of Flames?
The basic reverse technique applies to all flames, but different sources call for different shapes, sizes, and colours.
Torches and candles: Small, narrow flames. Use a tight gradient — the flame might only be 3-4mm tall. Start white at the wick, fade to yellow quickly, and end with a thin orange-red tip. The flame should be narrowest at the base and slightly wider in the middle before tapering to a point.
Flaming swords and weapons: Wrap the flame around the blade shape. Paint the blade itself white as the fire’s core, then apply the yellow-orange-red gradient along the flames licking upward from the blade’s edge. The flames should follow the weapon’s shape but appear to be pulled upward by heat. Add wispy tendrils reaching off the blade edge.
Vehicle fires and burning wreckage: Larger, more chaotic flames. Use broader colour zones and add dark smoke effects at the very tips (dark grey or black above the red). The base of the fire should be intensely white-yellow, and the flames should billow and spread rather than pointing neatly upward. Weathering powders in orange and black can enhance the effect around the fire’s edges.
Magical/warp fire: Use non-standard colours. Tzeentch warpfire uses pink-blue-purple instead of the standard fire palette. The same reverse principle applies — brightest (white-pink) at the base, darkest (deep purple) at the tips. Green warpfire (Nurgle) runs from white-green to dark green. The reverse technique works regardless of colour palette.
Eyes and small glowing points: Even tiny flame effects on eye lenses follow the same approach. Dot white at the centre, ring it with yellow, then orange at the edges. For a quick single-colour glow, paint the eye socket with a bright colour and add a white dot at the centre.
How Do You Paint Object Source Lighting From Flames?
Object source lighting (OSL) makes it look like the flame is actually casting light onto the surrounding model. It’s a powerful effect that takes flames from “painted effect” to “believable light source.” For a complete guide on glow effects, see our plasma glow OSL tutorial.
Step 1: Identify the light radius. Light from a flame falls off rapidly with distance. On a miniature, the glow should only extend 5-10mm from the flame. Mark mentally which areas of the model would be hit by the light.
Step 2: Glaze the surrounding areas. Mix a very thin glaze of the flame’s dominant colour (usually orange-yellow) and apply it to the surfaces nearest the flame. The glaze should be strongest closest to the flame and fade to nothing at the edge of the light radius. Use 2-3 thin passes rather than one thick coat.
Step 3: Add hot spots. On surfaces directly adjacent to the flame (the hand holding a torch, the rim of a brazier), add a stronger highlight in yellow or even white. These hot spots sell the illusion that the flame is genuinely emitting light.
Step 4: Consider the opposite side. If one side of the model is lit by flame, the opposite side should be slightly darker than normal. This contrast between the lit and unlit sides makes the OSL effect much more convincing. It’s subtle but effective.
Frequently Asked Questions
Why do flames look wrong when painted normally?
Because normal painting order (dark at base, light at tips) reverses the real temperature gradient of fire. Real flames are brightest (hottest) at the base and darkest (coolest) at the tips. Your eye recognises this instinctively — reversed flames look more like coloured icicles than fire.
Can you paint flames with Contrast paints?
Yes. Prime the flame area white, apply Iyanden Yellow Contrast as a base coat, then layer Gryph-Hound Orange at the upper portions and Blood Angels Red at the tips. The Contrast paints create natural blending over the white primer. Touch up with pure white at the base afterward for the hot core.
What about green or blue flames?
The same reverse technique works with any colour palette. For green flames (Nurgle, warpfire), go from white at the base through bright green, mid green, to dark green at the tips. For blue flames (Tzeentch, spirit fire), go from white through light blue, mid blue, to dark blue-purple at the tips. The principle is always: brightest at the base, darkest at the tips.
How do you paint flames on a black undercoat?
Paint the entire flame shape white first (2-3 thin coats) before applying your flame colours. Yellow and orange are translucent pigments that look muddy over black. The white undercoat ensures vibrant, glowing colours. Some painters use a yellow base instead of white — this works but produces slightly less bright results.
How do you make flames look like they’re moving?
Paint the flame’s outline with wispy, irregular tendrils rather than a smooth shape. Real fire is chaotic — the edges should be ragged, with thin tongues of flame reaching outward and upward at different heights. Avoid symmetry. Make one side of the flame slightly longer than the other, as if wind is pushing it. Add tiny separated flame wisps that appear to have broken away from the main body.
Should you gloss varnish flames?
A spot gloss varnish on flames can enhance the glowing effect by making the surface slightly reflective. Apply gloss varnish only to the white-yellow core area, and matte varnish everything else. The contrast between the glossy flame core and matte surroundings adds to the illusion of emitted light.
Can I airbrush flames on miniatures?
Yes. Airbrushing is a great way to get smooth flame gradients. Spray the whole flame white, then build yellow, orange and red working towards the tips, keeping each colour tighter than the last. Use a low pressure and thin paint for control. You can then pick out the white core and wispy tendrils by brush for crisp detail.
Should I paint flames before or after the rest of the model?
Paint the main model first, then the flames, then any object source lighting. Doing the flame after the surrounding areas lets you tidy edges without repainting the model, and OSL has to go on last because it is a glaze over finished surfaces. If the flame is a separate part, such as a torch, paint it off the model and glue it on afterwards.
Related Content
- Warhammer Painting for Beginners — Everything You Need — essential painting guide for new hobbyists
- Best Paints for Warhammer — Complete Comparison Guide — recommended paints for Warhammer miniatures
- Object Source Lighting (OSL) — Complete Miniature Painting Guide — related painting technique and tutorial
- Drybrushing Tutorial — Fast Painting for Warhammer — popular drybrushing technique tutorial